By Carmel Schvartzman
In this tutorial we'll learn How to create an REST API back-end using ASP.NET MVC, in order to load the data with the Controller in our AngularJS Blogs Application. That AngularJS controller will get a Resource via dependency injection. You can follow this step by step tutorial as a standalone, or you can learn all the posts to build the entire app. This is the STEP 10 in this walkthrough to design an end-to-end AngularJS client MVC app. This is the starting of the REST API: here we'll learn to create a REST for just GET requests, which returns all the posts of the Blog. In further tutorials we'll add the REST API methods to perform CRUD operations, such as CREATE, UPDATE, DELETE or FETCH A SINGLE POST.
In Visual Studio 2012 you can use the Web API template to get the REST API in place. However, we'll use an plain ASP.NET MVC application and manually create the REST interface. This way we'll get a REST API using JSON (JavaScript Object Notation) and not XML, which is the default of the Web API template.
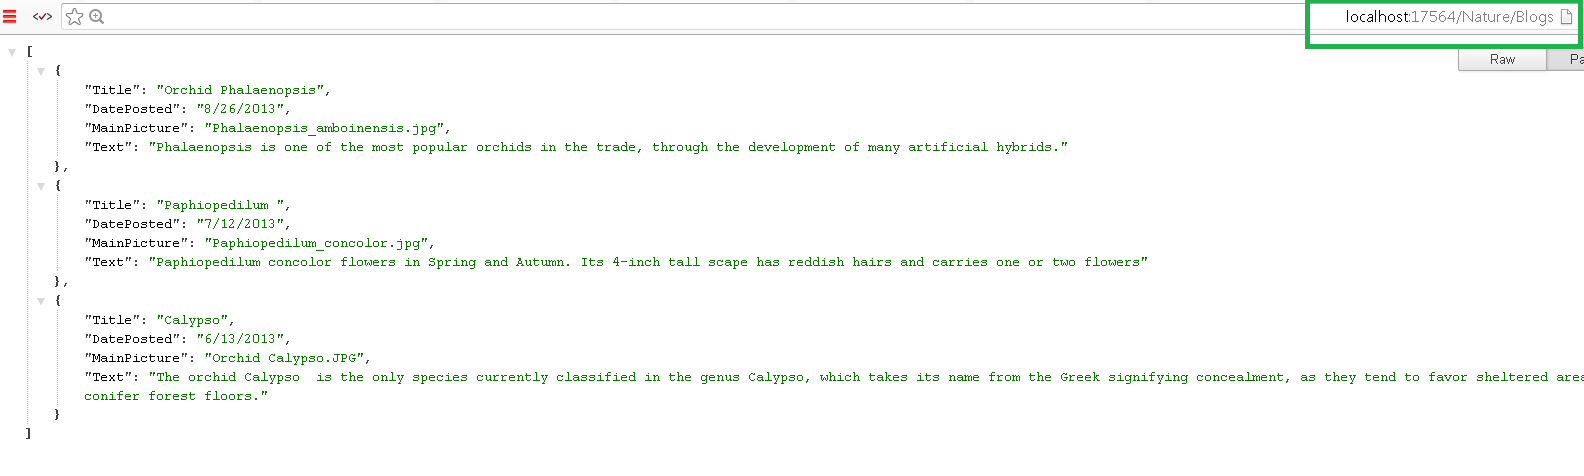
By the end of this short tutorial we'll have the following JSON data displayed in the browser:
1. In order to create the REST API let's open Visual Studio and use the ASP.NET MVC project we deployed in previous tutorials. Next, add a new Controller as follows:
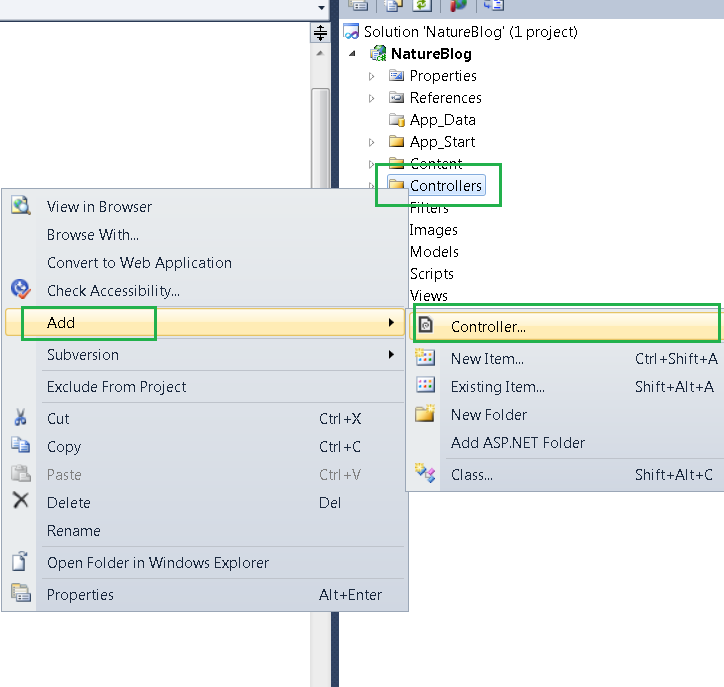
2. In the "Add Controller" dialog, type the name of the controller. Remember that the "Controller" term is part of the MVC convention, so type "Nature" + "Controller" in order to design our REST API:

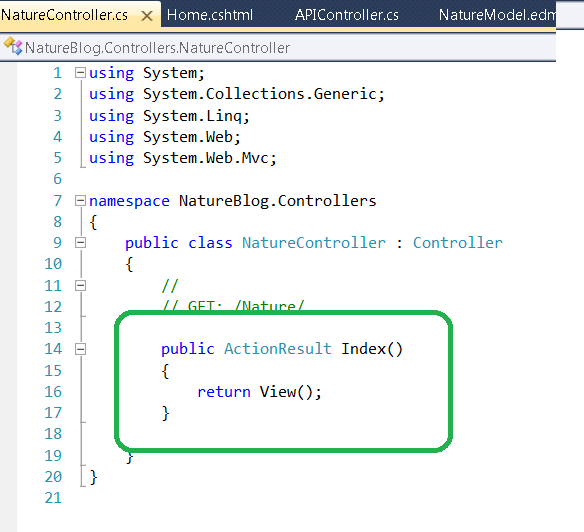
3. We get a method called "Index" that returns an ActionResult object:
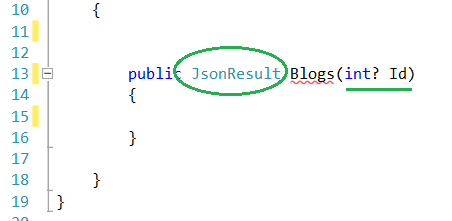
4. Because we want our API return JSON, change the returned value to "JsonResult". Also, let's call the method "Blogs", because it will return the blog posts saved in the database. Notice we stated that the method can get an optional "Id" argument : that will allows us to use this method for both fetching ONLY ONE post ( if we send an ID to the method ) or ALL the posts ( if we don't ):
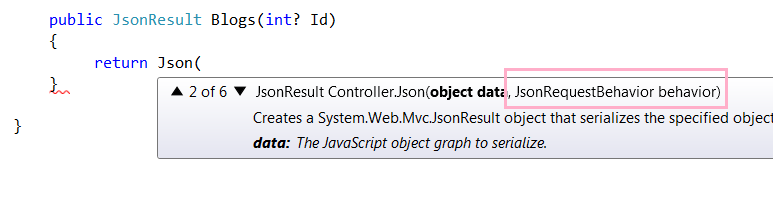
5. As for the returned object, type "Json" and you'll get the following intellisense aid:
 As you see, the Json object returns JsonResult, which in turn serializes the data to JSON format.
6. Notice we will use the "2 of 6" option of the Json overloaded constructor. Because we want the method to react to a GET http request, we must state that as the JsonRequestBehavior of the function:
 Therefore, select the "AllowGet" option:

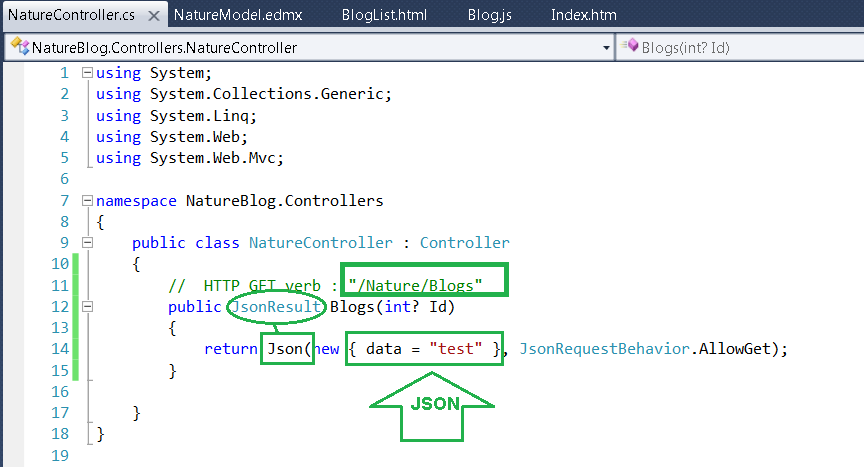
Also, because we use an BOTTOM-UP approach, let's test our REST API returning just a string, to see how it works. So give the Json constructor a POCO object containing just a field "data" instantiated to the string "test". It will be serialized by the JsonResult to the JSON { "data":"test" }.
8. Go to the "DEBUG" menu and select "START WITHOUT DEBUGGING" or press CTL-F5. That will launch the AspNet Development Server using some default port ( in my case, you can see it uses the port 17564) . Open the browser and type "localhost:XXXXX/nature/blogs/" ( replace the XXXXX with the port you are using ) :

You can see that our REST API reacts to a GET browser request.
9. Open your SQLSERVER Management Studio and type some demo data to the Blog table: (reference to the tutorial to create the database tables):

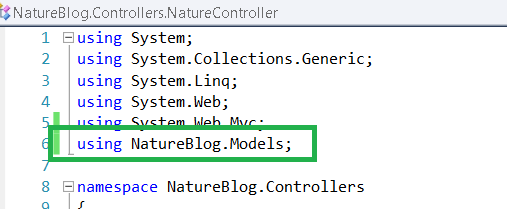
10. As you can remember from our previous tutorial on adding an Entity Framework , we can use the NatureModel we created there, so add the following "using" directives:
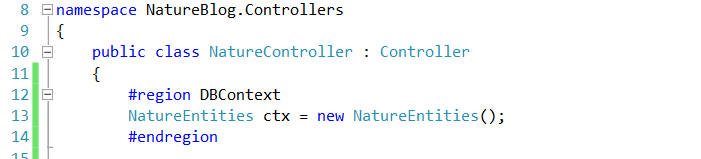
11. Next, let's initialize the Context:
12. Now it's time of replace the test data we just used with the true posts. Declare a generic List of Blog objects, and fetch all the blogs as follows:

13. And construct the Json object this time using the true data:

14. Rebuild your project ( F6 ) and switch to the browser. Refresh it and instead of the test data ( { "data":"test" } ) we'll see the true data in JSON notation:
As we stated above, in further tutorials we'll add the REST API methods to perform CRUD operations, such as CREATE, UPDATE, DELETE or FETCH A SINGLE POST.
That's all!!
Happy programming.....
2. In the "Add Controller" dialog, type the name of the controller. Remember that the "Controller" term is part of the MVC convention, so type "Nature" + "Controller" in order to design our REST API:
3. We get a method called "Index" that returns an ActionResult object:
4. Because we want our API return JSON, change the returned value to "JsonResult". Also, let's call the method "Blogs", because it will return the blog posts saved in the database. Notice we stated that the method can get an optional "Id" argument : that will allows us to use this method for both fetching ONLY ONE post ( if we send an ID to the method ) or ALL the posts ( if we don't ):
5. As for the returned object, type "Json" and you'll get the following intellisense aid:
6. Notice we will use the "2 of 6" option of the Json overloaded constructor. Because we want the method to react to a GET http request, we must state that as the JsonRequestBehavior of the function:
7. Change the comments to remind yourself that this method answers HTTP GET requests, and that the REQUEST URL must be "http://localhost:XXXXX/Nature/Blogs":
Also, because we use an BOTTOM-UP approach, let's test our REST API returning just a string, to see how it works. So give the Json constructor a POCO object containing just a field "data" instantiated to the string "test". It will be serialized by the JsonResult to the JSON { "data":"test" }.
8. Go to the "DEBUG" menu and select "START WITHOUT DEBUGGING" or press CTL-F5. That will launch the AspNet Development Server using some default port ( in my case, you can see it uses the port 17564) . Open the browser and type "localhost:XXXXX/nature/blogs/" ( replace the XXXXX with the port you are using ) :
You can see that our REST API reacts to a GET browser request.
9. Open your SQLSERVER Management Studio and type some demo data to the Blog table: (reference to the tutorial to create the database tables):
10. As you can remember from our previous tutorial on adding an Entity Framework , we can use the NatureModel we created there, so add the following "using" directives:
11. Next, let's initialize the Context:
12. Now it's time of replace the test data we just used with the true posts. Declare a generic List of Blog objects, and fetch all the blogs as follows:
13. And construct the Json object this time using the true data:
14. Rebuild your project ( F6 ) and switch to the browser. Refresh it and instead of the test data ( { "data":"test" } ) we'll see the true data in JSON notation:
That's all!!
Happy programming.....
כתב: כרמל שוורצמן
No comments:
Post a Comment