By Carmel Schvartzman
In this tutorial we'll learn how to perform sorting a Grid using the AngularJS Framework in our AngularJS Blogs Application.You can follow this step by step tutorial as a standalone, or you can learn all the posts to build the entire app. This is the STEP 14 in this walkthrough to design an end-to-end AngularJS client MVC app.
In the MODEL-VIEW-CONTROLLER architecture of AngularJS, a VIEW is related to a MODEL in the configuration step of the AngularJS app live, when we link it to some CONTROLLER.
This linking action is set in a Module, with the function of declaratively set how the AngularJS app should be bootstrapped. It's like the Main method in a program, setting the instantiation of the application.
Because AngularJS is based on the Dependency Injection paradigm, here is the place to configure the app injecting the functionality that we'll need.
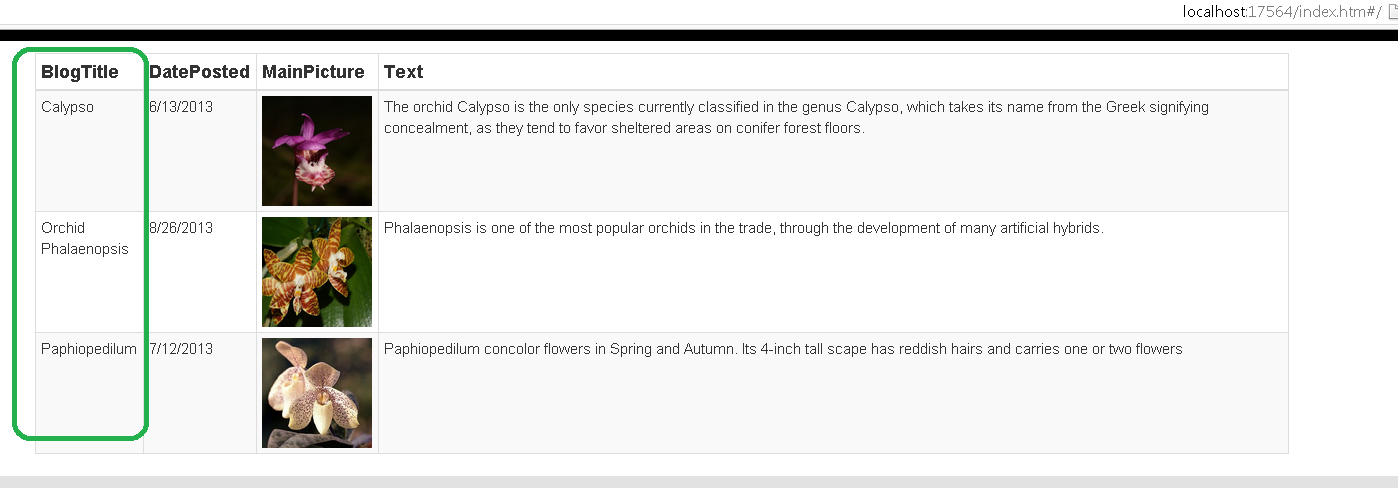
We'll add sorting functionality to an AngularJS table, resulting the following :

In order to do that, we need to create the sorting functionality at the back-end of our application, the RESTful API we beggining to develop in former tutorials. Go to the MVC controller:

There, append the following two parameters to the Blogs method:
The first specifies which field will the sorting be made, the second tells whether the sorting will be ascending or descending.
Remember we have the following 4 fields to make the sorting:

Next, declare another List<Blog> collection, which will hold the sorted items:

Because we want to sort according to 3 of the fields, add this switch:

Then, if the sortAscending field is true, use the OrderBy() List method:

Elsewhere, let's use the OrderByDescending() method:
Code the same for the others sorting options:

Finally, modify the return statements to reflect the name of the new collection we just declared:

Now our API Blogs() method expects the following parameters:

Take a look at the AngularJS $resource we coded in the .JS file:

In order to use our sorting functionality we must append those arguments to the request. Let's see the AngularJS documentation:

We search the " $resource " keyword to find that the request is send by a "query" method:

We have already build that in our AngularJS controller:

So we just need to append the new arguments to that method:

By now, we just send a hard coded request in which we set the sorting to be ascending ( sortAscending = true ) and according to the field "BlogTitle".
Let's check whether the API responds as is expected, returning a sortered list:
OK, it worked. Now let's try another field. Hard code the "DatePosted" column:

And the response is:

Replace in the query method the former code with the new variables:

Refresh and see the results: the sorting is now by the DatePosted field, and descending:

Now, enclose the query method in a function, which we could call from the markup himself:

The query() method includes a callback function to deal with the returned data. So append it to the arguments, allowing the grid to be refreshed every time we call the new loadPosts() function:

In order to check whether or not it will work, let's call the function in a hard coded way and refresh the html:

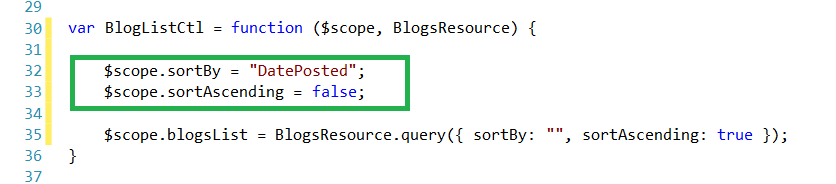
The resulting response is as follows:

It's OK , since the request just sent the default arguments we wrote earlier ("DatePosted" - "Descending").
Now add a parameter to this function, setting by which field the sorting should be made:

Hard code a value ( "BlogTitle" ) to see if it works:

And our RESTful API returns a descending sorting by "BlogTitle", as expected :

Everything's ready to use that function from the AngularJS view. Go to the View and to the headings of the grid:

... And replace the <th> text by links that will call the function with the corresponding column names:

Finally, let's toggle the ascending-descending functionality inside the function:

The final function code should be as follows:

Meaning that, if the selected field is the same of the former selected field, the user has clicked twice the same column, intending to invert the ascending-descending sort.
Otherwise, the user selected another column to sort by, so reset the sort direction to the default .
Let's see how it works. save and refresh the browser, and click some column title:

Next click again the same field:

The sort direction has been inverted!!
Add the same functionality to the other columns:

And we have an AngulerJS grid with sorting functionality:
That's all!!
Happy programming.....
כתב: כרמל שוורצמן


